Chrome Sync
Chrome Sync enables users to sync bookmarks, passwords, and more across devices. When enabled, you can access your bookmarks on all devices. If you save your passwords, it will login for you.
Note:
- FCPS Staff may have multiple Chrome profiles on their FCPS device.
- Students can only create a Chrome profile for their @fcpsschools.net account when using an FCPS device.
- Students can have multiple Chrome profiles on a personal device.
- The instructions below provide support for both personal and FCPS devices. If using an FCPS device, some instructions may not apply to students.
Why would you want to use Chrome Sync?
Chrome Sync lets you:
- save bookmarks.
- save passwords.
- access installed Chrome Extensions.
- access your synced information on any device.
Chrome Sync also helps with data security:
- It makes it easier to use complex passwords. Having a unique complex password for each online account will help protect your data.
- Do not reset passwords that use your FCPS network account. It is ok to reuse these passwords.
To view this video clip again, click the Replay button ![]() .
.
Important Information about Chrome Sync
Remember
- Follow the Acceptable Use Policy (AUP): Staff AUP | Student AUP.
- Only sync school information to your fcpsschools.net account.
To make sure you are only syncing school related information:
- Use different Chrome profiles to keep information separate. This is important when using personal devices shared by other family members.
- Switch between profiles depending on the work you are doing.
Important:
- Only log in to Chrome when using your FCPS device or a device you own.
- Use different profile photos for your @fcpschools.net Chrome profile and other Chrome profiles so you can easily see which profile you are using.
To view this video clip again, click the Replay button ![]() .
.
Before Turning on Chrome Sync: Bookmarks
Before turning on Chrome Sync, export your current bookmarks so you have a backup. You can restore your bookmarks from the back up if needed.
Exporting Your Bookmarks
- Open Chrome
- At the top right of Chrome, click the more icon
- Select bookmarks
- Select bookmark manager
- Click the more icon
on the upper right of the blue bar
- Click Export bookmarks
- Select where you want to save your bookmarks. They will download to your computer as an HTML file.
- Click Save
To view this video clip again, click the Replay button ![]() .
.
Import Your Bookmarks
After you turn on Chrome Sync, if you are missing any bookmarks you can import them. When you import bookmarks, they will be in an Imported Folder. See the section on Organizing Bookmarks to rearrange them.
- At the top right of Chrome, click the more icon
- Select Bookmarks and then Import Bookmarks and Settings
- From the drop-down menu, select the Bookmarks HTML file
- Choose File
- Locate the exported bookmarks.html file and then click open
To view this video clip again, click the Replay button ![]() .
.
Import Bookmarks from Other Browsers to Chrome
To import bookmarks from most browsers, such as Internet Explorer:
- Open Chrome
- At the top right of the Chrome browser, click the more icon
- Select Bookmarks and then Import Bookmarks and Settings
- From the drop-down menu, select the browser you want, and then Import
- Click Done
The bookmarks will be in an Imported Bookmarks folder. You can reorganize your bookmarks if you wish.
To view this video clip again, click the Replay button ![]() .
.
Organize your Bookmarks
If your bookmarks are in a different order than you want, you can organize them.
- Open Chrome
- At the top right of the Chrome Browser, click the more icon
- Select Bookmarks and then Bookmark Manager
- Drag a bookmark up or down or drag a bookmark into a folder on the left. You can also copy and paste your bookmarks in the order you want.
- You can also edit or delete a bookmark by clicking the more icon to the right of an individual bookmark.
To view this video clip again, click the Replay button ![]() .
.
Important Information About Chrome Profiles
View the video clip for this section for information about Chrome Profiles.
Important: Always sign out of the device you are using before allowing another user to use it. Do not turn on Chrome Sync when using a public computer.
To view this video clip again, click the Replay button ![]() .
.
Switch Between Chrome Profiles
- Open Chrome
- At the top right, click Profile
- Choose the profile you want to switch to

To view this video clip again, click the Replay button ![]() .
.
Remove a Chrome Profile
- On your computer, open Chrome
- At the top right, click Profile
- Click the Manage People button
beside Other People
- Click the more icon
- Click Remove this person
- Click Remove this person again to confirm
To view this video clip again, click the Replay button ![]() .
.
Change a Name or Photo
- Open Chrome
- Switch to the profile you want to edit. If you’re already using the correct profile, skip to number 3.
- At the top right, click Profile
- Choose the profile you want to use
- At the top right, click Profile
- Click the name above the profile image
- Enter a new name or choose a new photo. The change will save automatically.
To view this video clip again, click the Replay button ![]() .
.
Create a Chrome Profile
To create a Chrome Profile:
- Open Chrome
- At the top right, click Profile
- Click Add
- Enter a name and choose a photo
- Click Add
- Repeat these steps to set up as many profiles as needed.
To view this video clip again, click the Replay button ![]() .
.
Turn on Chrome Sync
Chrome Sync Best Practices
- Using Chrome Sync is optional
- Use Chrome Sync only on the school device assigned to you or on a device you own.
- Do not turn on Chrome Sync on a public computer.
- When using public computers, use guest mode. It is also recommended that you use an incognito/private browsing session. Note: guest mode and incognito browsing are not available on FCPS devices.
- Always log out of the FCPS device you are using before allowing another user to login to the device.
To turn on Sync, you'll need to sign in to Chrome with a Google Account. Remember that the Google Account you sign into Chrome with is the account your data will sync with.
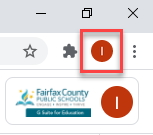
- Open Chrome
- At the top right, click Profile
Be sure to click the profile image to the right of the address bar. Don’t confuse it with the one associated with Drive, Docs, etc.
- Sign in to your Google Account
- Repeat to create more profiles as needed
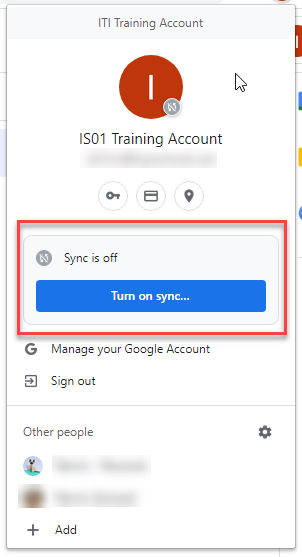
- If you want to sync your info across all your devices, click Turn on sync and then Turn on.
Repeat the above process for each device you want to sync with your fcpsschools.net account. Only use Chrome Sync on your FCPS issued device or a device that you own.
Remember to switch between profiles depending on the work you are doing.
To view this video clip again, click the Replay button ![]() .
.
Customize Advanced Chrome Sync Settings
- Click on your Chrome Profile image to customize your Chrome Sync settings.

- Click the Sync Status area. It may look different than this image depending on whether you have sync turned on or off.
- By default, Chrome sync settings are set to "Sync everything". This includes:
- Apps
- Autofill
- Bookmarks
- Extensions
- Omnibox history
- Passwords
- Settings
- Themes
- Open tabs
- Choose Customize Sync to choose what information you want to sync. If you use a different password manager, you have the option to not sync passwords.
Note:
- Google pay is disabled in our domain, so this is not applicable.
- Apps are now only for Chromebooks and will be discontinued for all devices by 2022.
To view this video clip again, click the Replay button ![]() .
.
Password Manager and Checkup
Password Manager can remember your passwords and sign-in to your accounts for you.
Turning on “Offer to Save Passwords” is optional. If you don’t want Chrome to ask you to save your passwords, you can turn it off by going to your Chrome Profile settings.
- Click your Chrome profile image
- Click the Passwords button
- Turn Offer to Save Passwords on or off, depending on your preference

When you use “Offer to Save Passwords,” you can perform a password check. This will identify if you are reusing passwords or have compromised passwords. If you have a compromised password, you should change it.
To perform a password check, go to the Google Password Manager.
Important: Do not reset passwords for FCPS accounts that use the same sign on, even when offered the option to do so. Same sign on accounts use your FCPS network username and password. (e.g. Google Workspace, Schoology, etc.) You will receive an alert that your FCPS accounts cannot reuse the same password. You can ignore changing these passwords. For all other accounts, you can now create a unique complex password. Chrome will remember it and login for you. After performing the Password Checkup, you will see something like to this:

To view this video clip again, click the Replay button ![]() .
.
Summary of Important Points
Chrome Sync Important Points
- Using Chrome sync is optional.
- Only turn on Chrome Sync on your FCPS issued device or on a personal device that you own.
- You can choose what you want to sync.
- When using a public computer or any device you do not own, do not sign into Chrome. Use a guest account and incognito mode.
- You can set up separate Chrome profiles for school use and other use. This helps prevent you from syncing school information to personal accounts.
- You must remember to switch between profiles depending on the work you are doing.
- Before turning on Chrome Sync, export your current bookmarks so you have a backup.
- After turning on Sync, you may be missing bookmarks.
- You can use the backup to import them.
- When you import bookmarks, they will go to the imported folder.
- You can organize your bookmarks by choosing Manage Bookmarks.
Password Manager Important Points
- Perform password checks regularly by going to the Google Password Manager.
- DO NOT reset passwords for FCPS same sign on accounts. (e.g. Google Workspace, Schoology, etc.) Same sign on accounts are those that use your FCPS username and password.
- Using Offer to Save Passwords is optional.
- Do not sync personal passwords or autofill data with your @fcpsschools.net account.
- Do not sync school information to personal Chrome profiles.